One of the cool features of the SRX line, inherited from the older Netscreen/ScreenOS family, are the Screen Options, which protect against some of the most common reconnaissance and attack methods. Basically, it is a low-level, simplified sort of IDS/IPS method, focusing on Layer3 and Layer4 attacks. On the plus side, it is fairly simple to set up and does not require any special licenses.
What makes Screens so desirable is that they are the first step in the Junos Flow process after Session lookup. This means they will already filter out suspect traffic before it can start consuming more resources.
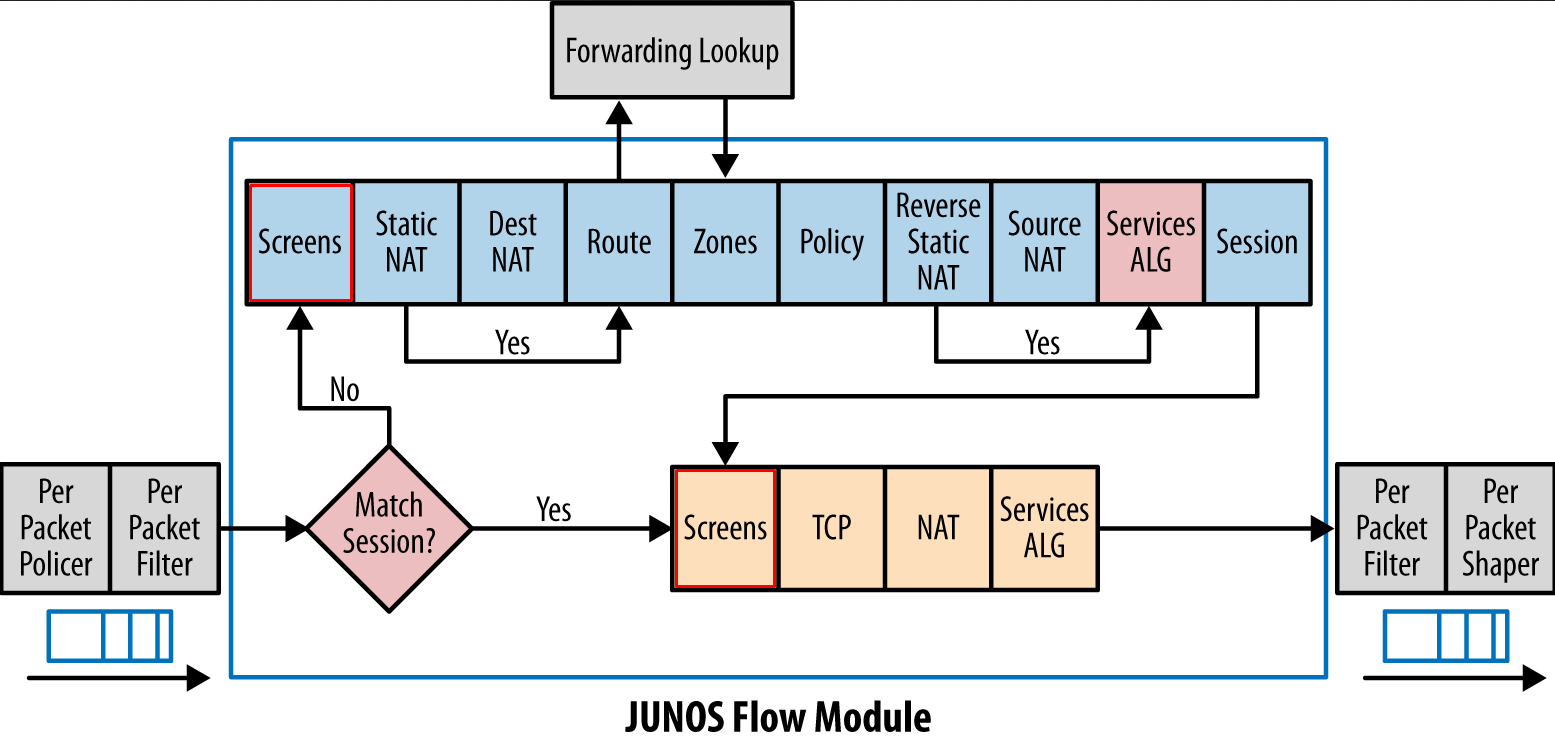
Screens are always applied on the ingress of the interface, meaning you have to keep in mind where the suspect packets will arrive on for it to be effective. Depending of the level of trust you give to different zones, different profiles will be created and applied.
Here is the topology I will be using to explore some of the most common Screen Options.

Initial configuration
The first thing to do would be to configure a Screen profile and attach it to a zone. Again, it only works ingress on the interfaces, so the screen will be applied on the attacker zone. Setup is simple.
Go to Screen stanza under the Security options and define a new Screen profile by using the set ids-option command – let’s not add any screens just yet.
[edit security screen]
root@NP-vSRX-01# set ids-option Attack-Screen description "Screen Attacker Zone"
Attach the new screen to the Security Zone. If you know where to find it you can save some CLI time by using the top command.
[edit security screen]
root@NP-vSRX-01# top set security zones security-zone attacker screen Attack-Screen
Verify the configuration with a show | compare
[edit security screen]
root@NP-vSRX-01# top show | compare
[edit security]
+   screen {
+       ids-option Attack-Screen {
+           description "Screen Attacker Zone";
+       }
+   }
[edit security zones security-zone attacker]
+    screen Attack-Screen;
Then commit the changes
[edit]
root@NP-vSRX-01# commit comment "Attack-Screen setup"
commit complete
Now that the Screen profile is attached to the attacker zone, we can try out some of the most important Screen options and the attacks they will defend against.
icmp ip-sweep – Protecting against ping sweeps
On internet-facing firewalls, a ping sweep shouldn’t pose too much of a threat as most public firewalls are (and should be!) configured to drop ICMP traffic. Not so much the case on intranet firewalls though, where ICMP is commonly permitted between “trusted” networks. In these cases, an attacker that is already on the LAN would have no issues mapping out hosts with ping sweeps alone. So, if you have an SRX that’s routing traffic between intranet segments, this one should be enabled.
We can activate the ip-sweep screen under our Screen profile by configuring icmp ip-sweep. The only adjustable parameter is the threshold.
[edit security screen ids-option Attack-Screen]
root@NP-vSRX-01# set icmp ip-sweep ?
Possible completions:
  <[Enter]>            Execute this command
  threshold            Threshold (1000..1000000 microseconds in which 10 ICMP packets are detected)
  |                    Pipe through a command
As the description points out, the threshold defines the number of microseconds it can take for 10 ICMP echo-requests to pass through the device. When ten packets are received during the threshold window, any additional packets for the remainder of the threshold will be dropped.
The default is 5000, which is 0.005 seconds. If I want it be more sensitive I will need to increase that number. For now, let’s just start with the defaults and commit.
ids-option Attack-Screen {
    description "Screen Attacker Zone";
    icmp {
        ip-sweep;
    }
}
For testing purposes, I have permitted ICMP traffic between our attacker’s zone and the dmz. Let’s see if the Screen will detect a standard nmap ping sweep from the attacker box
lab@Host200:~$ sudo nmap -sP 10.0.100.1-254

Starting Nmap 6.46 ( http://nmap.org ) at 2015-07-19 20:14 CEST
Nmap scan report for 10.0.100.1
Host is up (0.015s latency).
Nmap scan report for 10.0.100.100
Host is up (0.017s latency).
Nmap done: 254 IP addresses (2 hosts up) scanned in 33.38 seconds
It took nmap 33 seconds to sweep through a /24 range. Let’s see if that was fast enough to trigger the Screen…
root@NP-vSRX-01> show security screen statistics zone attacker | match ICMP | match sweep
  ICMP address sweep                         229
229 packets detected that were above the 10 packets per 0.005 second range.
Interesting fact: using the nmap command without sudo still gives me the same results (active hosts) but it did not trigger the Screen option. Might need to Wireshark that one day to find a difference.
Here is what is in the security logs:
2015-07-19 18:28:06 UTC  Address sweep! source: 10.0.200.200, destination: 10.0.100.239, zone name: attacker, interface name: ge-0/0/2.0, action: drop
2015-07-19 18:28:06 UTC  Address sweep! source: 10.0.200.200, destination: 10.0.100.87, zone name: attacker, interface name: ge-0/0/2.0, action: drop
2015-07-19 18:28:06 UTC  Address sweep! source: 10.0.200.200, destination: 10.0.100.180, zone name: attacker, interface name: ge-0/0/2.0, action: drop
2015-07-19 18:28:06 UTC  Address sweep! source: 10.0.200.200, destination: 10.0.100.180, zone name: attacker, interface name: ge-0/0/2.0, action: drop
Again, this should only be enabled if your security policy explicitly permits ICMP traffic.
tcp port-scan – limiting TCP portscans
After a host has been flagged as live on the network, the next step in recon would be to do a vertical TCP port scan against it. This is done by sending SYN-packets to the service ports. When a service is listening on a port, it will by design respond with a SYN-ACK and the port is flagged as active. The most well-known scanning tool is of course nmap.
As was the case with the ICMP sweep, a Threshold period is defined during which 10 packets can legitimately be received from one source IP. Any excess packets that are received within this window are dropped, and a logging event will be triggered.
Enabling the Screen, with a threshold value of 3 miliseconds.
[edit security screen ids-option Attack-Screen]
root@NP-vSRX-01# set tcp port-scan threshold 3000
[edit security screen ids-option Attack-Screen]
root@NP-vSRX-01# top commit
Doing a bog-standard TCP port-scan from the attacker box:
lab@Host200:~$ nmap -n 10.0.100.100

Starting Nmap 6.46 ( http://nmap.org ) at 2015-07-19 20:54 CEST
Nmap scan report for 10.0.100.100
Host is up (0.68s latency).
Not shown: 998 closed ports
PORT     STATE    SERVICE
22/tcp   open     ssh
5060/tcp filtered sip

Nmap done: 1 IP address (1 host up) scanned in 78.55 seconds
And here are the Screen statistics for the TCP port-scan:
[edit security screen ids-option Attack-Screen]
root@NP-vSRX-01# run show security screen statistics zone attacker | match "TCP port scan"
  TCP port scan                              869
Works like a champ! One thing worth mentioning is that it took nmap substantially longer to complete, 78 seconds. This is because the SRX is dropping packets when the Screen is activated. In the other case, without the Screen, the server is responding with a RST packet. For comparison, here is the result without the Screen option – 1.23 seconds.
lab@Host200:~$ nmap -n 10.0.100.100

Starting Nmap 6.46 ( http://nmap.org ) at 2015-07-19 20:57 CEST
Nmap scan report for 10.0.100.100
Host is up (0.0021s latency).
Not shown: 998 closed ports
PORT     STATE    SERVICE
22/tcp   open     ssh
5060/tcp filtered sip

Nmap done: 1 IP address (1 host up) scanned in 1.23 seconds
Syslog events:
2015-07-19 18:51:40 UTC  TCP port scan! source: 10.0.200.200:45826, destination: 10.0.100.100:135, zone name: attacker, interface name: ge-0/0/2.0, action: drop
2015-07-19 18:51:41 UTC  TCP port scan! source: 10.0.200.200:36665, destination: 10.0.100.100:25, zone name: attacker, interface name: ge-0/0/2.0, action: drop
2015-07-19 18:51:41 UTC  TCP port scan! source: 10.0.200.200:50739, destination: 10.0.100.100:1213, zone name: attacker, interface name: ge-0/0/2.0, action: drop
2015-07-19 18:51:42 UTC  TCP port scan! source: 10.0.200.200:44565, destination: 10.0.100.100:5298, zone name: attacker, interface name: ge-0/0/2.0, action: drop
2015-07-19 18:51:43 UTC  TCP port scan! source: 10.0.200.200:32828, destination: 10.0.100.100:9099, zone name: attacker, interface name: ge-0/0/2.0, action: drop
IP options – record-route, timestamp, security, stream and source-routing
These ones cover a couple of derelict options in the IP header that were originally introduced in RFC791..
Here’s a quick rundown of the proposed IP options, straight from the RFC.
- Option 2 – Security – Used to carry Security, Compartmentation, User Group (TCC), and Handling Restriction Codes compatible with DOD requirements.
- Option 3 – Loose Source Routing – Used to route the internet datagram based on information supplied by the source.
- Option 9 – Strict Source Routing – Used to route the internet datagram based on information supplied by the source
- Option 7 – Record Route – Used to trace the route an internet datagram takes.
- Option 4 – Timestamp – Internet Timestamp
- Option 8 – Stream ID – used to carry the stream identifier
Because these options are no longer used in current-day traffic, it is best to have them filtered or at least detected by the Screens. If a packet with any of these options is detected, a syslog event will be recorded.
Some clarification about the three different source-route Screens:
loose-source-route-option: logs when packets with option 3 are detectedstrict-source-route-option: logs when packets with option 9 are detectedsource-route-option: discards all packets where source-route options are detected
Depending on your own preference, you can choose to detect soure-route options or block them altogether. I don’t see any reason to let this pass, so I will configure the source-route-option.
Because it’s slightly related, I will also enable the bad-options screen. This will drop any packet that has malformed IP options in the header field.
Here is how all of the IP options Screens are enabled:
[edit security screen ids-option Attack-Screen]
root@NP-vSRX-01# set ip security-option record-route-option timestamp-option stream-option source-route-option bad-option
root@NP-vSRX-01# show | compare
[edit security screen ids-option Attack-Screen]
+  ip {
+      bad-option;
+      record-route-option;
+      timestamp-option;
+      security-option;
+      stream-option;
+      source-route-option;
+  }
tcp syn-fin, fin-no-ack and tcp-no-flag – Operating System detection
By setting an illegal TCP flag and analysing the way the host responds, an attacker might be able to identify the remote Operating System and move on to trying OS-specific exploits. By enabling these Screen options, the SRX will detect and block these specific packets. The configuration is straightforward – all you need to do is enable them.
[edit security screen ids-option Attack-Screen]
root@NP-vSRX-01# set tcp tcp-no-flag syn-fin fin-no-ack

[edit security screen ids-option Attack-Screen]
root@NP-vSRX-01# commit
commit complete
Let’s see if nmap is using any of these options to recognise the OS.
lab@Host200:~$ sudo nmap -O 10.0.100.100

Starting Nmap 6.46 ( http://nmap.org ) at 2015-07-19 22:46 CEST
Nmap scan report for 10.0.100.100
Host is up (0.0032s latency).
Not shown: 998 closed ports
PORT     STATE    SERVICE
22/tcp   open     ssh
5060/tcp filtered sip
No exact OS matches for host (If you know what OS is running on it, see http://nmap.org/submit/ ).
TCP/IP fingerprint:
OS:SCAN(V=6.46%E=4%D=7/19%OT=22%CT=1%CU=43081%PV=Y%DS=2%DC=I%G=Y%TM=55AC0D0
OS:9%P=x86_64-pc-linux-gnu)SEQ(SP=104%GCD=1%ISR=10E%TI=Z%TS=8)OPS(O1=M5B4ST
OS:11NW7%O2=M5B4ST11NW7%O3=M5B4NNT11NW7%O4=M5B4ST11NW7%O5=M5B4ST11NW7%O6=M5
OS:B4ST11)WIN(W1=7120%W2=7120%W3=7120%W4=7120%W5=7120%W6=7120)ECN(R=Y%DF=Y%
OS:T=40%W=7210%O=M5B4NNSNW7%CC=Y%Q=)T1(R=Y%DF=Y%T=40%S=O%A=S+%F=AS%RD=0%Q=)
OS:T2(R=N)T3(R=N)T4(R=N)T5(R=Y%DF=Y%T=40%W=0%S=Z%A=S+%F=AR%O=%RD=0%Q=)T6(R=
OS:N)T7(R=N)U1(R=Y%DF=N%T=40%IPL=164%UN=0%RIPL=G%RID=G%RIPCK=G%RUCK=G%RUD=G
OS:)IE(R=Y%DFI=N%T=40%CD=S)

Network Distance: 2 hops

OS detection performed. Please report any incorrect results at http://nmap.org/submit/ .
Nmap done: 1 IP address (1 host up) scanned in 113.28 seconds
The results are quite impressive. Effectively, nmap has failed to detect the underlying Operating System. In the Screen statistics, we can see that quite a number of alarms were triggered:
root@NP-vSRX-01# run show security screen statistics zone attacker
Screen statistics:

IDS attack type                              Statistics
  ICMP flood                                 0
  UDP flood                                  0
  TCP winnuke                                0
  TCP port scan                              47
  UDP port scan                              0
  ICMP address sweep                         0
  TCP sweep                                  0
  UDP sweep                                  0
  IP tear drop                               0
  TCP SYN flood                              0
  IP spoofing                                0
  ICMP ping of death                         0
  IP source route option                     0
  TCP land attack                            0
  TCP SYN fragment                           0
  TCP no flag                                20
  IP unknown protocol                        0
  IP bad options                             0
  IP record route option                     0
  IP timestamp option                        0
  IP security option                         0
  IP loose source route option               0
  IP strict source route option              0
  IP stream option                           0
  ICMP fragment                              0
  ICMP large packet                          0
  TCP SYN FIN                                20
  TCP FIN no ACK                             20
  Source session limit                       0
  TCP SYN-ACK-ACK proxy                      0
  IP block fragment                          0
  Destination session limit                  0
  IPv6 extension header                      0
  IPv6 extension hop by hop option           0
  IPv6 extension destination option          0
  IPv6 extension header limit                0
  IPv6 malformed header                      0
  ICMPv6 malformed packet                    0
It seems that Nmap is in fact using the No-Flag, SYN-FIN and FIN-no-ACK flags to identify the OS, and has tried each method 20 times. Interestingly, it sent the probes to the only open port, 22.
In the Security log, the following messages were recorded multiple times:
2015-07-19 20:44:32 UTC  No TCP flag! source: 10.0.200.200:45357, destination: 10.0.100.100:22, zone name: attacker, interface name: ge-0/0/2.0, action: drop
2015-07-19 20:44:32 UTC  SYN and FIN bits! source: 10.0.200.200:45358, destination: 10.0.100.100:22, zone name: attacker, interface name: ge-0/0/2.0, action: drop
2015-07-19 20:44:32 UTC  FIN but no ACK bit! source: 10.0.200.200:45362, destination: 10.0.100.100:1, zone name: attacker, interface name: ge-0/0/2.0, action: drop
Because this is turning into quite a lengthy post, I will wrap up here and continue with the other Screens in an upcoming post.
Thanks for reading, and feel free to add your commments or remarks below!
One thought on “SRX Screen Options – Part 1”