The Juniper Virtual Chassis technology allows you to combine multiple physical switches into one logical switch stack, which reduces the management overhead of dealing with many switches. Because all members are acting as a single device, with a proprietary control protocol underneath, there is no need for Spanning Tree and its blocked links. It also has dual routing engine support, albeit with some feature limitations on the EX2200 platform.
Unlike the high-end Juniper switches, the EX2200 does not have dedicated virtual-chassis ports either, so you are limited to using the on-board ethernet ports. The cross-member bandwidth should be OK for basic access deployments though, so here’s how to set it up.
First, gather the serial numbers of all your switches. There are several commands that will show you the serial. I’ve used show chassis hardware
root> show chassis hardware
Hardware inventory:
Item             Version  Part number  Serial number     Description
Chassis                                CW0210160462      EX2200-24T-4G
Routing Engine 0 REV 11   750-026468   CW0210160462      EX2200-24T-4G
FPC 0            REV 11   750-026468   CW0210160462      EX2200-24T-4G
  CPU                     BUILTIN      BUILTIN           FPC CPU
  PIC 0                   BUILTIN      BUILTIN           24x 10/100/1000 Base-T
  PIC 1          REV 11   750-026468   CW0210160462      4x GE SFP
Power Supply 0                                           PS 100W AC
Fan Tray                                                 Fan Tray
Do this for all your switches and copy them to notepad. You will need them later. Mine are indicated on the diagram below.
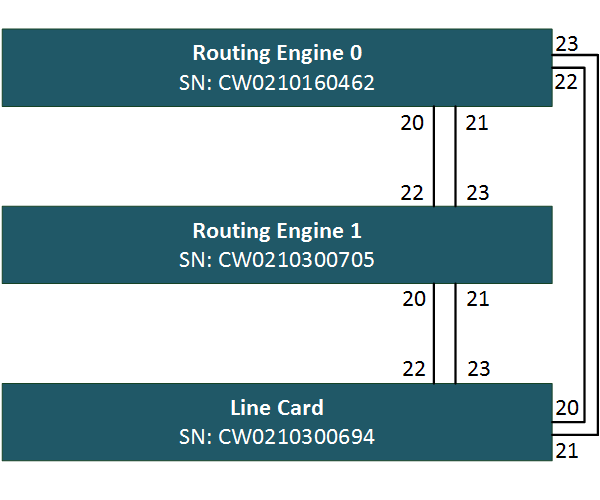
Next, we need to configure our Ethernet ports for virtual-chassis functionality. The EX2200 does not have dedicated VCP ports so we need to convert some ethernet ports. As shown on the drawing, I will use the last four ports on each switch. To activate the ports for VC functionality, enter the following commands.
{master:0}
root> request virtual-chassis vc-port set pic-slot 0 port 20

{master:0}
root> request virtual-chassis vc-port set pic-slot 0 port 21

{master:0}
root> request virtual-chassis vc-port set pic-slot 0 port 22

{master:0}
root> request virtual-chassis vc-port set pic-slot 0 port 23
Rinse and repeat on switch two and three. You can verify the ports were added correctly to the virtual chassis with the following command.
root> show virtual-chassis vc-port
fpc0:
--------------------------------------------------------------------------
Interface   Type              Trunk  Status       Speed        Neighbor
or                             ID                 (mbps)       ID  Interface
PIC / Port
0/20        Configured         -1    Down         1000
0/21        Configured         -1    Down         1000
0/22        Configured         -1    Down         1000
0/23        Configured         -1    Down         1000
Before we can move on to connecting the cables, we have to set up the virtual chassis parameters on our primary routing engine.
We will set up the virtual-chassis in pre-provisioned mode, where we manually tie the serial ids to the member id. The first two switches will be configured as routing engines, one master and one backup, and the last switch will serve as a dumb old line-card. In my case, the virtual chassis configuration on routing engine 0 looks like this:
{master:0}[edit virtual-chassis]
root# show
preprovisioned;
member 0 {
    role routing-engine;
    serial-number CW0210160462;
}
member 1 {
    role routing-engine;
    serial-number CW0210300705;
}
member 2 {
    role line-card;
    serial-number CW0210300694;
}
Now that this is set up, I have connected the cables and the virtual chassis has formed. You can verify VC state and inter-switch connectivity using the show virtual-chassis status command.
root> show virtual-chassis status

Preprovisioned Virtual Chassis
Virtual Chassis ID: fd81.5b7b.172c
Virtual Chassis Mode: Enabled
                                           Mstr           Mixed Neighbor List
Member ID  Status   Serial No    Model     prio  Role      Mode ID  Interface
0 (FPC 0)  Prsnt    CW0210160462 ex2200-24t-4g 129 Master*   NA  1  vcp-255/0/20
                                                                 1  vcp-255/0/21
                                                                 2  vcp-255/0/22
                                                                 2  vcp-255/0/23
1 (FPC 1)  Prsnt    CW0210300705 ex2200-24t-4g 129 Backup    NA  2  vcp-255/0/20
                                                                 2  vcp-255/0/21
                                                                 0  vcp-255/0/22
                                                                 0  vcp-255/0/23
2 (FPC 2)  Prsnt    CW0210300694 ex2200-24t-4g   0 Linecard  NA  0  vcp-255/0/20
                                                                 0  vcp-255/0/21
                                                                 1  vcp-255/0/22
                                                                 1  vcp-255/0/23
This command shows us the IDs, serials and roles of all the members. The far-right columns also show on which ports the neighbours are detected. You can use this to verify everything is properly cabled up.
A quick terse command also shows us all interfaces in the stack are available, except for the ones we dedicated as VCP ports.
root> show interfaces terse | no-more
Interface               Admin Link Proto    Local                 Remote
vcp-255/0/20            up    up
vcp-255/0/20.32768      up    up
vcp-255/0/21            up    up
vcp-255/0/21.32768      up    up
vcp-255/0/22            up    up
vcp-255/0/22.32768      up    up
vcp-255/0/23            up    up
vcp-255/0/23.32768      up    up
ge-0/0/0                up    down
ge-0/0/0.0              up    down eth-switch
ge-0/0/1                up    down
ge-0/0/1.0              up    down eth-switch
ge-0/0/2                up    down
ge-0/0/2.0              up    down eth-switch
ge-0/0/3                up    down
ge-0/0/3.0              up    down eth-switch
ge-0/0/4                up    down
ge-0/0/4.0              up    down eth-switch
ge-0/0/5                up    down
ge-0/0/5.0              up    down eth-switch
ge-0/0/6                up    down
ge-0/0/6.0              up    down eth-switch
ge-0/0/7                up    down
ge-0/0/7.0              up    down eth-switch
ge-0/0/8                up    down
ge-0/0/8.0              up    down eth-switch
ge-0/0/9                up    down
ge-0/0/9.0              up    down eth-switch
ge-0/0/10               up    down
ge-0/0/10.0             up    down eth-switch
ge-0/0/11               up    down
ge-0/0/11.0             up    down eth-switch
ge-0/0/12               up    down
ge-0/0/12.0             up    down eth-switch
ge-0/0/13               up    down
ge-0/0/13.0             up    down eth-switch
ge-0/0/14               up    down
ge-0/0/14.0             up    down eth-switch
ge-0/0/15               up    down
ge-0/0/15.0             up    down eth-switch
ge-0/0/16               up    down
ge-0/0/16.0             up    down eth-switch
ge-0/0/17               up    down
ge-0/0/17.0             up    down eth-switch
ge-0/0/18               up    down
ge-0/0/18.0             up    down eth-switch
ge-0/0/19               up    down
ge-0/0/19.0             up    down eth-switch
ge-1/0/0                up    down
ge-1/0/0.0              up    down eth-switch
ge-1/0/1                up    down
ge-1/0/1.0              up    down eth-switch
ge-1/0/2                up    down
ge-1/0/2.0              up    down eth-switch
ge-1/0/3                up    down
ge-1/0/3.0              up    down eth-switch
ge-1/0/4                up    down
ge-1/0/4.0              up    down eth-switch
ge-1/0/5                up    down
ge-1/0/5.0              up    down eth-switch
ge-1/0/6                up    down
ge-1/0/6.0              up    down eth-switch
ge-1/0/7                up    down
ge-1/0/7.0              up    down eth-switch
ge-1/0/8                up    down
ge-1/0/8.0              up    down eth-switch
ge-1/0/9                up    down
ge-1/0/9.0              up    down eth-switch
ge-1/0/10               up    down
ge-1/0/10.0             up    down eth-switch
ge-1/0/11               up    down
ge-1/0/11.0             up    down eth-switch
ge-1/0/12               up    down
ge-1/0/12.0             up    down eth-switch
ge-1/0/13               up    down
ge-1/0/13.0             up    down eth-switch
ge-1/0/14               up    down
ge-1/0/14.0             up    down eth-switch
ge-1/0/15               up    down
ge-1/0/15.0             up    down eth-switch
ge-1/0/16               up    down
ge-1/0/16.0             up    down eth-switch
ge-1/0/17               up    down
ge-1/0/17.0             up    down eth-switch
ge-1/0/18               up    down
ge-1/0/18.0             up    down eth-switch
ge-1/0/19               up    down
ge-1/0/19.0             up    down eth-switch
ge-2/0/0                up    down
ge-2/0/0.0              up    down eth-switch
ge-2/0/1                up    down
ge-2/0/1.0              up    down eth-switch
ge-2/0/2                up    down
ge-2/0/2.0              up    down eth-switch
ge-2/0/3                up    down
ge-2/0/3.0              up    down eth-switch
ge-2/0/4                up    down
ge-2/0/4.0              up    down eth-switch
ge-2/0/5                up    down
ge-2/0/5.0              up    down eth-switch
ge-2/0/6                up    down
ge-2/0/6.0              up    down eth-switch
ge-2/0/7                up    down
ge-2/0/7.0              up    down eth-switch
ge-2/0/8                up    up
ge-2/0/8.0              up    up   eth-switch
ge-2/0/9                up    down
ge-2/0/9.0              up    down eth-switch
ge-2/0/10               up    down
ge-2/0/10.0             up    down eth-switch
ge-2/0/11               up    down
ge-2/0/11.0             up    down eth-switch
ge-2/0/12               up    down
ge-2/0/12.0             up    down eth-switch
ge-2/0/13               up    down
ge-2/0/13.0             up    down eth-switch
ge-2/0/14               up    down
ge-2/0/14.0             up    down eth-switch
ge-2/0/15               up    down
ge-2/0/15.0             up    down eth-switch
ge-2/0/16               up    down
ge-2/0/16.0             up    down eth-switch
ge-2/0/17               up    down
ge-2/0/17.0             up    down eth-switch
ge-2/0/18               up    down
ge-2/0/18.0             up    down eth-switch
ge-2/0/19               up    down
ge-2/0/19.0             up    down eth-switch
bme0                    up    up
bme0.32768              up    up   inet     128.0.0.1/2
                                            128.0.0.16/2
                                            128.0.0.32/2
                                   tnp      0x10
bme0.32770              down  up   eth-switch
bme0.32771              down  up   eth-switch
dsc                     up    up
gre                     up    up
ipip                    up    up
lo0                     up    up
lo0.16384               up    up   inet     127.0.0.1           --> 0/0
lsi                     up    up
me0                     up    down
me0.0                   up    down inet
mtun                    up    up
pimd                    up    up
pime                    up    up
tap                     up    up
vlan                    up    up
vlan.0                  up    up   inet     192.168.1.1/24
vme                     up    down
We can login to other chassis member for troubleshooting by using the following command. When you log in to a line card JunOS will alert you that it shouldn’t be used for configuration.
root> request session member 2

--- JUNOS 12.3R11.2 built 2015-09-24 11:14:53 UTC
root@:LC:2%
root@:LC:2% cli
warning: This chassis is operating in a non-master role as part of a virtual-chassis (VC) system.
warning: Use of interactive commands should be limited to debugging and VC Port operations.
warning: Full CLI access is provided by the Virtual Chassis Master (VC-M) chassis.
warning: The VC-M can be identified through the show virtual-chassis status command executed at this console.
warning: Please logout and log into the VC-M to use CLI.
{linecard:2}
root>
The out of band management interface, on the back of the switches, can use the same shared IP address across all VC members. To do so, you need to configure the vme interface with the desired management IP. In the background, all member’s management ports (otherwise known as me interfaces) are added to a special management VLAN which is tied to the layer3 vme interface.
{master:0}[edit interfaces]
root# show vme
unit 0 {
    family inet {
        address 10.6.66.25/24;
    }
}
All physical management interfaces can be connected to the OOB management VLAN, and the virtual chassis can respond to ARP requests on all of them.
Note – the VME interface will not work if you already have conflicting configuration on the me interface.
Because we have two routing engines, it’s also recommended to configure the commit synchronize option. When the configuration is committed on the primary routing engine, it will copy over to the backup routing engine. Both routing engines will then validate and activate the new configuration during the commit operation.
{master:0}[edit]
root# set system commit synchronize
Under the hood, the switches are running VCCP, a Juniper proprietary protocol largely based on IS-IS. If you’re interested, you can verify much of the protocol state from the command line, but I won’t go into detail.
root> show virtual-chassis protocol ?
Possible completions:
  adjacency            Show virtual chassis adjacency database
  database             Show virtual chassis link-state database
  interface            Show virtual chassis protocol interface information
  route                Show virtual chassis routing table
  statistics           Show virtual chassis performance statistics
Quoting Juniper here, “most high availability features, including Graceful Routing Engine switchover (GRES), Nonstop bridging (NSB), Nonstop active routing (NSR), and Nonstop software upgrade (NSSU), are not supported on an EX2200 Virtual Chassis.” Therefore, I would not rely an EX2200 virtual chassis as a core switch HA solution.. It does make sense using EX2200 virtual chassis in the access layer though, for simplified management and cross-switch etherchannel connectivity.
Removing Virtual-Chassis Configuration
A switch that was previously member of a virtual chassis may give you some headache when you’re trying to use it as a standard switch again. For example, VC ports can not be returned to their original state, or you might see that it stays in the previous role, even though you’ve removed the configuration. Here’s what seems to work for me.
If you haven’t done so, delete all virtual-chassis configuration
{linecard:2}[edit]
root# delete virtual-chassis
root# commit
warning: Could not connect to fpc0 : Can't assign requested address
warning: Cannot connect to other RE, ignoring it
commit complete
Go into shell mode (start shell) and delete all virtual chassis configuration files.
root@:LC:0% cd /config/vchassis/
root@:LC:0% ls
vc.db                   vc.tlv.db.0             vclocal.conf.tlv
vc.param                vc.tlv.db.1             vclocal.conf.tlv.0
vc.tlv.db               vclocal.conf            vclocal.conf.tlv.1
root@:LC:0% rm *.*
Then, return to operational mode with the cli command and do a system reboot to flush all stale virtual-chassis configuration from memory.
After the reboot, the switch will be in the default state again
Amnesiac (ttyu0)

login: root
Password:

--- JUNOS 12.3R11.2 built 2015-09-24 11:14:53 UTC
root@:RE:0% cli
{master:0}
root> show virtual-chassis

Virtual Chassis ID: 7c29.6cd0.a3b3
Virtual Chassis Mode: Enabled
                                           Mstr           Mixed Neighbor List
Member ID  Status   Serial No    Model     prio  Role      Mode ID  Interface
0 (FPC 0)  Prsnt    CW0210300694 ex2200-24t-4g 128 Master*   NA

Member ID for next new member: 1 (FPC 1)

{master:0}
root> show virtual-chassis vc-port
fpc0:
--------------------------------------------------------------------------

{master:0}
Any questions or comments? Feel free to add them below!